If you want to use OpenAI’s AI models via the API, you’ll need something called an API key.
This guide will walk you through:
✅ What an API key is and why you need one
✅ How to create an OpenAI account
✅ How to generate an API key
✅ How to set up billing (if required)
No technical experience? No problem! This guide is designed for complete beginners.
What Is an API Key? Why Do You Need One?
An API key is a unique identifier that allows OpenAI to verify your identity and track your usage when you interact with its AI models. It serves two main functions:
- Authentication: Your API key tells OpenAI who is making the request, ensuring only authorized users can access the service.
- Usage Tracking & Billing: OpenAI charges based on the amount of text (tokens) you process. The API key links your usage to your account, allowing OpenAI to track how much you’re using and bill you accordingly.
If it helps, think of an API key like the meter ID on your electricity meter:
- Your electric meter ID tells the power company who is using electricity at your home.
- The meter measures how much electricity you consume, and the company charges you accordingly.
Similarly:
- Your API key identifies who is making requests to OpenAI.
- OpenAI tracks how many tokens you use—just like the power company tracks how many kilowatt-hours (kWh) you use.
If you process more text (tokens) with OpenAI, your bill increases—just like using more electricity increases your power bill.
Now, let’s go step by step to generate your API key!
Step 1: Sign Up for an OpenAI Account
1. Go to OpenAI’s Website
- Open your web browser (Chrome, Edge, Firefox, etc.).
- Type https://platform.openai.com/signup and press Enter.
2. Create an Account
- If you already have a Google or Microsoft account, click “Continue with Google” or “Continue with Microsoft” for easy signup.
- Otherwise, enter your email address and click “Continue”.
3. Verify Your Email
- Check your email inbox for a verification email from OpenAI.
- Click the link in the email to verify your account.
Step 2: Set Up OpenAI API Access
Once your account is created, you need to set up API access to use OpenAI’s services.
1. Go to the API Key Page
- Visit https://platform.openai.com/account/api-keys
- Log in with your OpenAI credentials if prompted.

2. Generate a New API Key
- Click “Create a new secret key” and name it “My first API key”
- A long string of letters and numbers will appear—this is your API key.
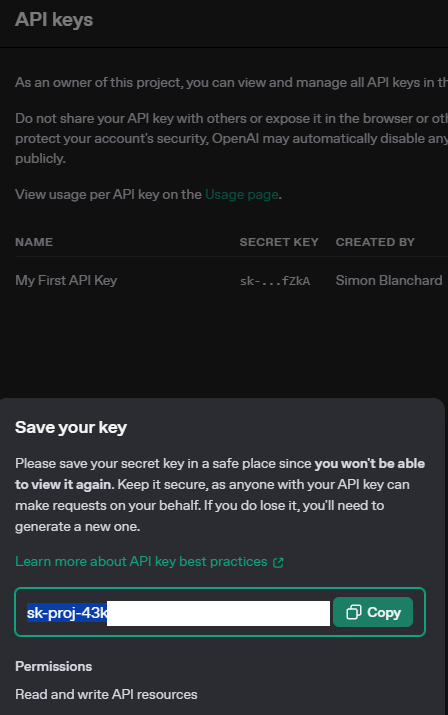
⚠ Important:
- Copy and save your API key in a safe place.
- You will not be able to see it again once you close the page.
- Never share your API key publicly (it’s like a password).
Step 3: Set Up Billing
Using the API is not free, even if you are a paid OpenAI subscriber.
- Visit https://platform.openai.com/account/billing.
- Click “Add Payment Details” and enter your card details.
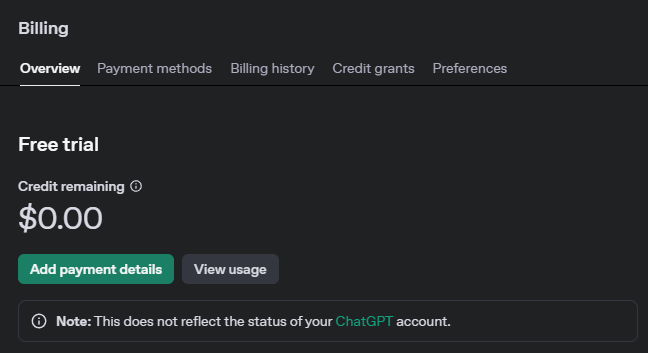
💡 Tip: Wondering how much to add? $5 to $10 is enough to get you started.
Step 4: Use Your API Key in Applications
Once you have your API key, you can use it in tools like SPSS, Python scripts, or survey platforms.
For example, if you’re using our SPSS code to code open-ended responses (🔗here), replace YOUR_OPENAI_API_KEY in your script with the key you just generated.
How to Track Your API Usage
You can monitor your API usage at:
🔗 https://platform.openai.com/account/usage
💡 Tip: If you’re doing large-scale research, set a usage limit in the billing settings to prevent unexpected charges.
Final Thoughts
✅ You’ve successfully created an OpenAI account.
✅ You’ve generated an API key to use in applications.
✅ You’ve set up billing and learned how to track usage.
Now you’re ready to start integrating OpenAI’s models into your projects! 🚀
📌 Next Step:
Read Part 2: Understanding OpenAI Pricing & How to Estimate Costs

Leave a comment